Easy Safari-Inspired Bed Canopy
Featured on Apartment Therapy
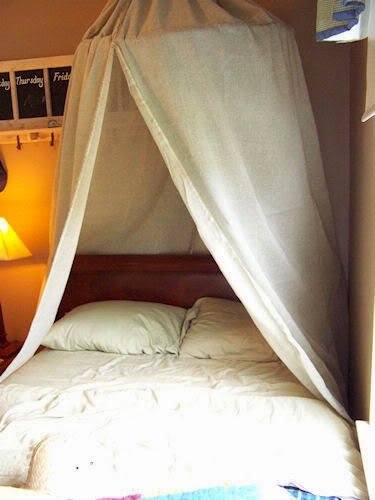
🛏 How to Make a Safari-Inspired Bed Canopy for Your Little Explorer
Every child deserves a little magic in their bedroom—a cozy nook that sparks imagination, invites adventure, and feels like their own special hideaway. For one of my boys, who was an explorer at heart, that magic came in the form of a homemade bed canopy.
He loved the idea of camping, safaris, and secret hideouts. So one afternoon, as I was tidying the garage, I spotted an old hula hoop. Later, while rummaging through my fabric stash, I came across six yards of soft muslin. In that moment, my brain connected the dots: the hula hoop + muslin = the perfect explorer’s canopy.
It turned out to be such a simple, affordable, and fun project that I couldn’t help but share it with you.
✂️ How I Made It
1. Prepare the Fabric
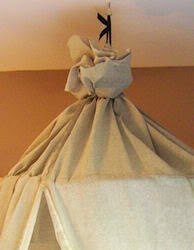
I cut the 6 yards of muslin into two equal lengths. About 2.5 feet from one end of each piece, I folded the fabric down and stitched a 2.5″ channel. This is where the hula hoop would thread through.
2. Thread the Hula Hoop
I gently pulled apart the hula hoop at its connection point (so easy!) and slid it through the stitched channels on both fabric pieces.
3. Gather & Tie
Once the hoop was in place, I pulled the short ends of the fabric together at the center of the hoop. I tied them off with an 18″ piece of grosgrain ribbon, creating a gathered top that would hang beautifully.
4. Close the Seams
For a quick finish, I hot glued the back seams together, though you could also sew them for a neater look.
5. Hang the Canopy
I screwed a sturdy hook into the ceiling over the bed, tied the remaining grosgrain ribbon ends to it, and—just like that—the canopy was ready.
🐘 The Fun Part
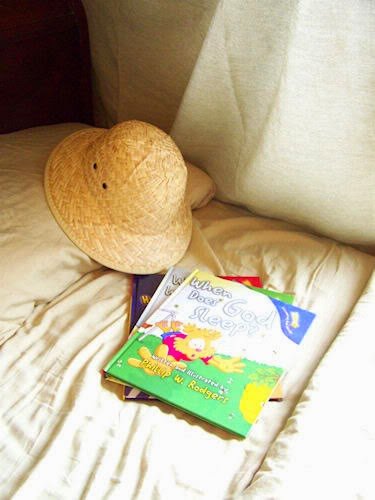
I tossed a few great books under the canopy (we love the Discovering God series by my friend Phillip W. Rodgers) and placed a safari hat at the foot of the bed. With a flashlight in hand, my little explorer was ready for hours of make-believe adventures—camping, reading, and dreaming of far-off places.
It was like bringing summer camp right into his bedroom.
This project is one of my favorites because it cost almost nothing, used what we already had, and turned into a treasured part of my son’s childhood memories. I hope you’ll give it a try—whether for your own little one or as a special surprise for a niece, nephew, or grandchild.
Happy crafting,
Aimee 🌿